MAYA動(dòng)畫教程:如何在建模時(shí)控制關(guān)節(jié)變形A
I started experimenting with this in -99, when Subdivided surfaces became available in Maya. I was looking for a better way to control those horrible joint deformations, without resorting to weight-painting, or dozens of high-res copies of the whole model for Blendshapes. I was also not happy about how 'un-smooth' the result was, when Smooth-Binding a high-res model straight to a skeleton.
At first I saw the Wrap deformers as possible stand-ins for muscle and bone, and modeled them quite anatomically correct... but I soon realized this deformer's influence zone is too 'blurry' when set high enough to catch all geometry around it, to be useful this way. So I gradually modeled the Wraps closer and closer in shape to the geometry they were deforming. Until in the end, I simply copied the 0 level of it, and set the influence zone down as low as I dared; this seems to give the best control. But it also means you have to make sure not to move any of the 0-level verts relative to its Wrapper double, because the first may easily end up outside of the influence of the second (which ruins the whole effect).

First sketch what you're going to model, and decide as much as you can about the topology. In this method everything depends on a good topology in the 0 level mesh.
Keep in mind:
* As low-res as possible, while still delineating the folds and major planes, and keeping enough divisions around joints.
* Triangles - not at all as bad as they say, least not in Maya. But keep them out of areas that deform a lot, and/or need to be smooth.
* Polys should always be as square as possible. Long thin polys are ONLY ok if they go in the direction of a fold or wrinkle.
* And most important - the direction of the edges must NEVER run at an oblique angle to either a form in the neutral un-deformed surface, or in the deformed one, or you'll be hurting later. Sometimes, like on the palm of the hand, the surface has 2 opposing sets of wrinkles depending on which way it bends, in this case try to catch both directions with your topology; if you can't get both, pick the most important one.
Model the surface according to your sketch and reference. You could start with a box, or a NURBS surface, it doesn't really matter, as long as you end up with a polygonal surface looking like your sketch. Use whatever poly-tools you're comfortable with.
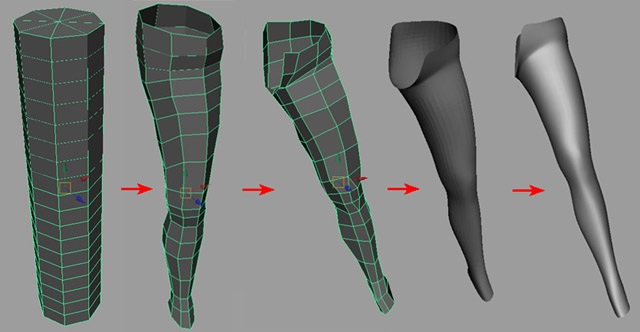
In this case I used a poly cylinder 8x17 (in fact 18 which I later found was one too many). Delete the top and bottom caps, Scale and Translate verts, first in the side view then front...
When you're done, if the edges don't run the way you need them to, use the Split Tool to create new edges, then delete the old edges. (Then delete any orphaned vertices, you don't need to be careful picking them, since only the orphaned ones can be deleted). Alternatively use "Delete Edge" from the "Edit Polygons" menu, this will automatically get rid of orphaned verts.
Since this topology is very important to the final result, you should take your time to fix things, don't rush on to the next stage. Also, you could theoretically use it as a basis for many other models.
IMPORTANT! NOW is the time to create your UV mapping
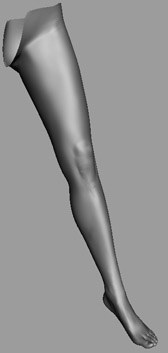
When you're totally satisfied with the topology and UV's, convert to SubD one last time and start editing on the higher levels. Remember: keep the hierarchy (not the same as the history).
You may have to go through a few false starts (God knows I have), since some problems don't become apparent until you start modeling on a higher level, or even until you start creating morf targets. Whenever you start over, you loose any work on the higher levels. That's why I spend so much time to get the 0 level just right; if you follow this tutorial you should save some time.
General advice for hierarchical SubD's:
Look for BlindData nodes in the Hypergraph (Upstream/Downstream), delete them.
Go back into Poly mode occasionally, then right back to Standard - it cleans up possible cracks both in the model and UV's.
To fix bad UV's on a hierarchical Subd, without loosing all your edits:
copy Subd model A to low-res poly model B (using the 0 level). Fix the UV's on B. Then turn B back to a Subd C, then use C as a base shape and A as a target shape and do a Blendshape - pulling the slider up to max should bring back the edits on C, and still have the good UV's. Then all you need to do is make a copy D of C, to freeze the deformations, and you're set.
When going back to an area for editing at a later date, try to find the lowest level that'll work. Otherwise you waste effort, and risk making the surface overly bumpy (since each higher level has 4 times the points than the one beneath). Such bumps are hard to get rid of, without deleting ALL the edits you've ever made on that level. You will also be confusing the issue for any later edits you may have to make there.
Let's continue - this is where it gets easier. You can finish modeling and fine tuning your SubD later (as long as you don't touch any verts on level 0), because you can detach and re-attach it to the skeleton with a few mouse-strokes at any time.
Copy the SubD surface, and convert the copy (on the 0 level) back to a polygon. Name it 'Wrapper', name the SubD 'Skin'. Make a few more copies of Wrapper, move them aside. Create 3 layers, one for Skin, one for Wrapper, one for Morftargets. Name the targets appropriately, for instance in this case: KneeLeft1 and 2. Create a Blendshape, call it Bodytargets.
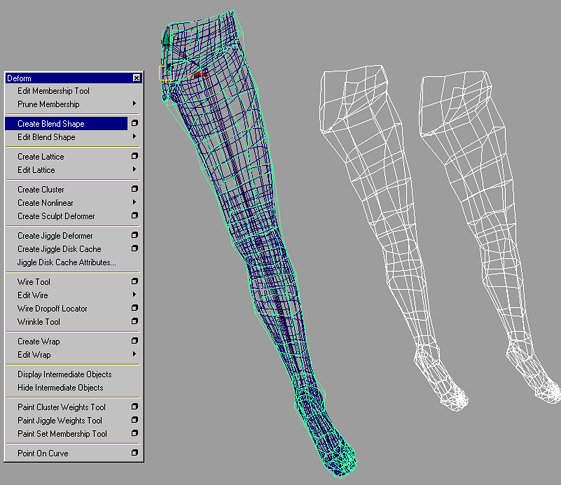
Smooth-Bind Wrapper to your skeleton (if you do this before the Blendshapes you'll have to rearrange the stack of deformations).
Set a keyframe on frame 0 for all the joints, then set keyframes on later frames with different joint rotations; for instance, I made this knee rotate to 90 degrees in Y on frame 1. That way I can quickly and easily jump between several exact values of rotation, even while hiding the skeleton - a great help later when doing the Set Driven Keys.

Create the Wrap, Skin is white, Wrapper is green, Max Distance as small as you can make it - Apply.
If you ever have to detach, pick the Skin, go into the Hypergraph, press F, press Downstream Connections and find wrap1 and wrap1Set and delete these. You also get invisible Base shapes left behind that you may have to find in the Outliner and delete.
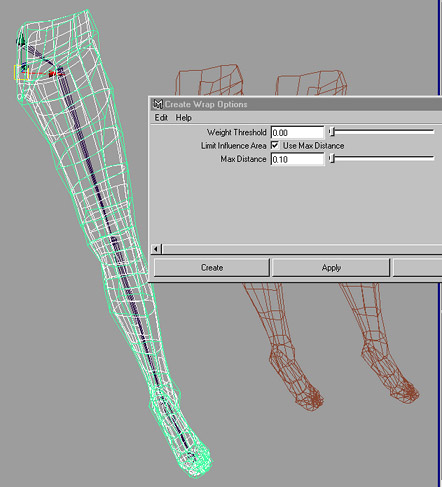
Now when I go to frame 1 the deformations look like in the first example below, pretty damn crappy if I do say so myself... but still better than if you used a collapsed SubD or high res poly mesh bound directly to the skeleton.
Pull the slider for KneeLeft1 up to 1 and start re-shaping the target. Keep it visible in the orthogonal views, wireframe, keep the Skin in the perspective view, smooth shaded.
入學(xué)要求 | 課程設(shè)置 | 暴雪動(dòng)態(tài) | 我要報(bào)名
學(xué)員作品 | 就業(yè)學(xué)員 | 招生問(wèn)答 | 暴雪簡(jiǎn)介
公司作品 | 周邊介紹 | 教學(xué)環(huán)境 | 乘車路線

